Performance Air Filter for Citroen Xsara / Xsara Picasso, Peugeot 206, 306 (1998-2010)
Couldn't load pickup availability
- Guaranteed Fitment
- Free Shipping, Lower 48 States
- Lifetime Warranty
Want it soon? Order within
Shop safely
Secure checkout with trusted payment providers.
High-Flow Air Filtration for Citroen Xsara and Peugeot 206 / 306 Engines
Who It’s For: Designed for owners of the Citroen Xsara, Xsara Coupe and Xsara Picasso and the Peugeot 206 and 306 running PSA TU, EW, XU and DW engines who want better throttle response and a reusable filter.
The Problem: Standard paper filters are designed for low production cost, not maximum air velocity. They restrict airflow and clog as they age, dulling throttle response on these engines.
The Solution: This BMC performance filter replaces your restrictive factory element with a multi-layered cotton gauze media. By utilizing a "Full Moulding" system, we provide a filter with no welded joints, preventing structural failure under high vacuum. This design allows for a filtration level of 7 microns (compared to 10 microns for OEM), ensuring your engine breathes cleaner, colder air without the turbulence associated with cheap paper replacements.
Why This is the Ultimate Upgrade
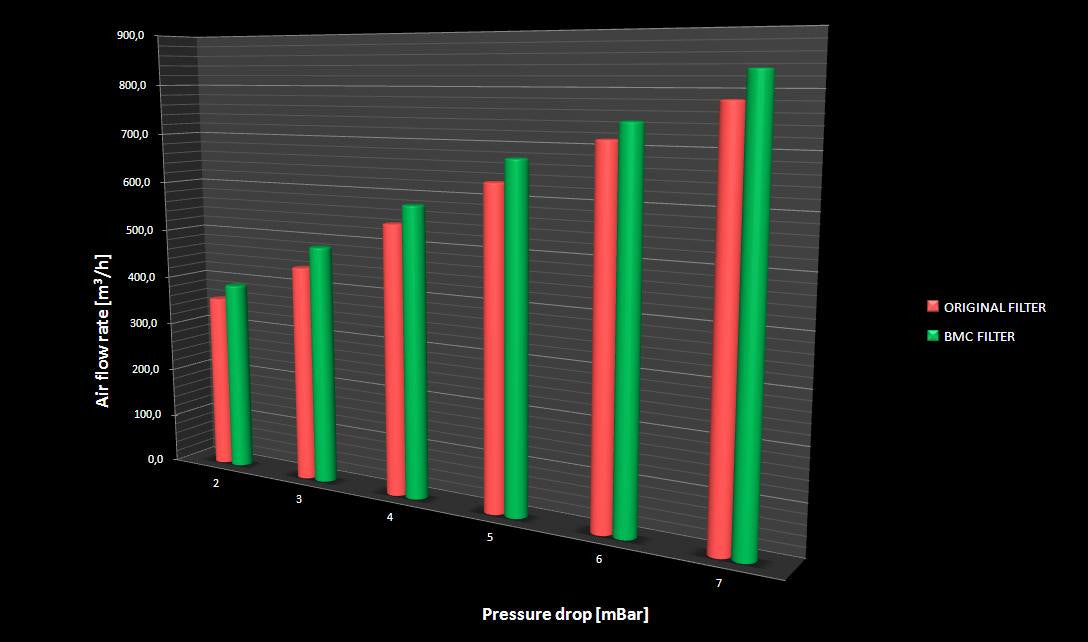
- Enhanced Air Velocity: The epoxy-coated alloy mesh and low-viscosity oil coating allow air to pass through the media with significantly less resistance than factory paper.
- Lifetime Durability: Unlike disposable filters, this unit is washable and regenerable. It is built to outlast the vehicle, saving maintenance costs over the long term.
- Precision Fitment: Engineered with high-adhesion rubber, this filter creates an airtight seal within the factory airbox, ensuring no "dirty air" bypasses the filtration media.
Technical Specifications
| Fitment | Citroen Xsara, Xsara Coupe, Xsara Picasso; Peugeot 206, 306 (1998-2010) |
| Dimensions | 169mm x 205mm panel |
| Part Number | BMC FB188/01 |
Compatibility & OEM Reference
Fits the following vehicles (BMC fitment data):
- Citroen Xsara 1.4 I4 Diesel (75 HP) | 2000-2005
- Citroen Xsara 1.9 I4 Diesel (70 HP) | 1998-2005
- Citroen Xsara 2.0 I4 (136 HP) | 2000-2005
- Citroen Xsara 2.0 I4 Diesel (90 HP) | 1999-2005
- Citroen Xsara 2.0 I4 Diesel (109 HP) | 2000-2005
- Citroen Xsara Coupe 1.8 I4 (110 HP) | 2000-2004
- Citroen Xsara Picasso 1.8 I4 (116 HP) | 2000-2010
- Citroen Xsara Picasso 2.0 I4 (136 HP) | 2003-2010
- Citroen Xsara Picasso 2.0 I4 Diesel (90 HP) | 1999-2010
- Citroen Xsara Picasso 2.0 I4 Diesel (109 HP) | 1999-2010
- Peugeot 206 1.1 I4 (60 HP) | 2002-2007
- Peugeot 206 1.4 I4 (75 HP) | 1999-2008
- Peugeot 206 1.6 I4 (90 HP) | 1999-2002
- Peugeot 206 1.6 I4 (109 HP) | 1999-2008
- Peugeot 206 1.9 I4 Diesel (70 HP) | 1998-2001
- Peugeot 206 2.0 I4 (90 HP) | 1999-2008
- Peugeot 206 2.0 I4 (135 HP) | 1999-2008
- Peugeot 206 2.0 I4 GTI (136 HP) | 2003-2006
- Peugeot 206 2.0 I4 RC (177 HP) | 2000-2006
- Peugeot 306 1.8 I4 (110 HP) | 1999-2003
- Peugeot 306 2.0 I4 Diesel (90 HP) | 1999-2003
OEM Cross Reference (BMC): CITROEN 1444J3, 1444QE, 1444R1, 1444R3, 1444TF, 1444VR; PEUGEOT 1444H0, 1444H3, 1444J4, 1444QF
The Performance Promise
Buy with confidence. As specialists in European performance, we know that the PSA TU, EW and DW engines rely on consistent airflow for thermal management and power delivery. This filter is a direct-fit upgrade that maintains factory tolerances while improving efficiency. Backed by real automotive experts and fast shipping.
Common Questions
Which vehicles does this filter fit?
BMC lists the Citroen Xsara, Xsara Coupe and Xsara Picasso, and the Peugeot 206 and 306 with 1.1 to 2.0 petrol and diesel engines.
Is it a direct fit?
Yes. It replaces the factory element in the stock airbox with no modifications.
Can I clean and reuse it?
Yes. Wash and re-oil it with a BMC regeneration kit.
How fine is the filtration?
The multi-layer oiled cotton traps particles down to 7 microns.
What will I notice after installing it?
Sharper throttle response and a stronger intake sound.
Fitment
Fitment
|
Make |
CitroenPeugeot |
|---|---|
|
Engine Size |
|
|
Year |
|
Installation & Tools
The Wrench Time
- Estimated Time: 30-45 Minutes
- Difficulty: 3/10 - Tight C5 engine bay clearance and fragile, heat-soaked plastic latches.
Tools You Will Need
- 10mm socket or box wrench (battery disconnect)
- Flathead screwdriver (standard and stubby)
- T25 Torx driver (shroud removal, if equipped)
- 90-degree pick tool (for stubborn harness latches)
- Shop vacuum or clean microfiber cloth (for airbox debris cleanup)
The C5 platform engine bay runs notoriously hot, baking every piece of under-hood plastic. The Mass Air Flow (MAF) harness connector and the Secondary Air Injection (SAI) lines become glass-brittle. Never pry the MAF connector latch with a screwdriver, or the retention tab will snap instantly. Instead, press the connector inward toward the sensor first, depress the release latch with your thumb pad or the smooth curve of a pick tool, and gently back it off. Additionally, watch out for the bottom-rear metal airbox tension clip—if you unhook it aggressively, it will ping off and disappear straight into the belly pan.
Phase 1: Removing the Factory Part from your 1997-2006 Audi A6 RS6 4.2L
- Disconnect the Battery: Pop the cowl cover and use a 10mm wrench to loosen the clamp on the negative battery terminal. Move the cable aside to prevent accidental contact, avoiding short circuits and spurious ECU trouble codes.
- Clear Bay Plastics: Remove the passenger-side plastic cosmetic engine covers by turning the quarter-turn fasteners 90 degrees by hand or with a flathead screwdriver. Lift the covers straight up to expose the airbox assembly tucked against the passenger fender.
- Disconnect the MAF Sensor Harness: Locate the MAF sensor mounted directly inline with the airbox outlet pipe. Push the harness plug forward slightly, depress the locking release tab, and slide the electrical connector off. Inspect the connector housing pins for any green corrosion or oil contamination.
- Loosen the Intake Accordion Duct: Using a flathead screwdriver, loosen the worm-gear clamp securing the rubber intake inlet hose to the MAF housing. Gently work the rubber duct off the hard plastic housing without wrenching on the surrounding brittle vacuum lines.
- Unlatch Airbox Housing Clips: Release the four spring-steel retaining clips holding the upper and lower airbox shells together. Use a stubby flathead screwdriver to carefully pry the blind bottom clips free if your fingers cannot reach them.
- Extract the Factory Filter: Lift the upper airbox lid upward and toward the center of the engine bay. Carefully pull the old paper element out of the lower airbox tray, ensuring torn paper fibers or loose road gravel do not fall into the clean-air intake duct.
Phase 2: Installing the Performance Air Filter
- Clean the Airbox Sump: Before fitting your new filter into the 1997-2006 Audi A6 RS6 4.2L housing, use a shop vacuum or a clean microfiber cloth to remove all accumulated sand, leaves, and road grit resting in the lower airbox tray.
- Seat the New Performance Filter: Align the Performance Air Filter into the lower housing. Press down along the entire perimeter with your fingers to confirm the flexible rubber or polyurethane sealing bead sits fully flush inside the factory groove. An uneven bead will cause an unmetered air leak (vacuum leak) and trip lean codes.
- Re-mate the Airbox Shells: Carefully guide the upper airbox lid back over the filter, ensuring the lower alignment tabs hook into their slots before clamping. Snap all four metal tension clips back into position with your fingers until you feel a positive mechanical lock.
- Reattach Intake Duct & Reconnect MAF: Slide the rubber intake accordion duct back over the MAF housing outlet. Secure the worm-gear clamp firmly with your flathead screwdriver, ensuring you do not overtighten and crush the plastic housing. Reconnect the MAF electrical plug until you hear an audible click. Reinstall your decorative engine covers.
- Terminal Reconnection & ECU Settle Cycle: Reconnect the negative battery terminal and cinch it tight with a 10mm wrench. Turn the ignition key to the "ON" position (do not crank) for 15 seconds to let the throttle body align. Start the engine and do not touch the gas pedal for at least 20 seconds while the ECU reads fresh idle airflow data and stabilizes fuel trims.
Disclaimer: This is a general guide provided for the 1997-2006 Audi A6 RS6 4.2L. Always refer to your factory service manual for exact torque specifications and safety procedures.
Warranty
Warranty
All products are backed by our Limited Lifetime Warranty. We stand by our quality. [See terms]

Shopping Safely
At our Shopify store, we prioritize your safety and security. Here's how we ensure a secure shopping experience:
1. Secure Transactions: We use advanced encryption to protect your personal and payment information, ensuring it is safely transmitted and safeguarded.
2. Trusted Payment Gateways: Our store integrates with trusted payment gateways, ensuring your transactions are processed securely and efficiently.
3. Data Privacy: Your privacy is our top priority. We follow strict data protection policies to keep your personal information confidential and secure.
4. Secure Platform: Shopify provides robust security features and continuous monitoring against vulnerabilities, ensuring a safe shopping environment.
5. Verified Merchants: We are a verified merchant on Shopify, committed to providing authentic and high-quality products.
6. Transparent Policies: Our clear return, refund, and shipping policies provide peace of mind, knowing we stand behind our products.
7. Customer Support: Our dedicated customer support team is ready to assist with any concerns or questions you may have.
Shop confidently at our Shopify store, where your safety and satisfaction are our top priorities.
$69.00