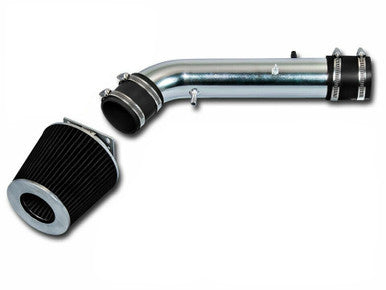
Cold Air Intake for Toyota 4Runner (1996-1999) Tacoma (1995-1999) 2.7L Engine
Couldn't load pickup availability
- Guaranteed Fitment
- Performance Tested
- Lifetime Warranty
Want it soon? Order within
Shop safely
Secure checkout with trusted payment providers.
Maximize Airflow and Throttle Response for your Toyota 3RZ-FE Engine
Who It’s For: Designed specifically for Toyota 4Runner and Tacoma owners running the 3RZ-FE 2.7L inline-four engine who want to wake up their truck’s performance during daily hauls or off-road excursions.
The Problem: The factory airbox on the 3RZ-FE is a maze of restrictive plastic baffles and corrugated tubing. This setup is designed for sound suppression rather than efficiency, which often leaves the engine feeling sluggish under load and creates a noticeable delay in throttle response.
The Solution: We engineered this intake system to replace that restrictive factory plumbing with smooth, mandrel-bent T304 aluminum. By providing a direct, high-velocity path to the throttle body, we eliminate the turbulence that plagues the stock 3RZ-FE, resulting in a cleaner power band and a much more responsive pedal feel.
Why This is the Ultimate Upgrade
- Proven Power Gains: Dyno-consistent gains of 7–10% Horsepower and 6–8% Torque by reducing intake pumping losses.
- T304 Aluminum Construction: Unlike plastic that can crack or heat-soak, our lightweight aluminum piping dissipates heat faster and provides a permanent, durable solution for the engine bay.
- Maintenance-Free Filtration: Includes a high-flow, washable pleated filter that provides superior filtration while allowing for significantly more CFM than paper filters.
Technical Specifications
| Fitment | 1995-1999 Toyota Tacoma / 4Runner |
| Engine Family | 3RZ-FE |
| Factory Ratings | 150 HP & 177 lb-ft Torque |
| Material | Mandrel-Bent T304 Aluminum |
Compatibility & OEM Reference
Fits the Following Vehicles:
- 1996 Toyota 4Runner 2.7L L4 Engine
- 1997 Toyota 4Runner 2.7L L4 Engine
- 1998 Toyota 4Runner 2.7L L4 Engine
- 1999 Toyota 4Runner 2.7L L4 Engine
- 1995 Toyota Tacoma 2.7L L4 Engine
- 1996 Toyota Tacoma 2.7L L4 Engine
- 1997 Toyota Tacoma 2.7L L4 Engine
- 1998 Toyota Tacoma 2.7L L4 Engine
- 1999 Toyota Tacoma 2.7L L4 Engine
Interchange Part Numbers:
3RZ-FE, 2.7, L4, 1995, 1996, 1997, 1998, 1999
The Performance Promise
Expert Tip: After you finish the install, disconnect your negative battery terminal for about 10 minutes. This resets the Long Term Fuel Trims (LTFT) in your ECU, allowing it to "re-learn" the new airflow parameters immediately rather than over several drive cycles. You’ll feel the difference on the very first pull. Buy with confidence from a team that knows Toyotas inside and out.
Fitment
Fitment
|
Make |
Toyota |
|---|---|
|
Engine Size |
|
|
Year |
|
Installation & Tools
The Wrench Time
- Estimated Time: 45-60 Minutes
- Difficulty: 3/10 – Straightforward driveway job with basic hand tools.
Tools You Will Need
- 10mm socket and ratchet (3/8" drive)
- 12mm socket with 6-inch extension
- #2 Phillips screwdriver (or JIS bit for sensor screws)
- 8mm nut driver or flathead screwdriver for hose clamps
- Pliers (for factory spring-type vacuum clamps)
- CRC MAF Cleaner (recommended maintenance while exposed)
On the 3RZ-FE engine found in this generation, the factory vacuum lines running to the Vacuum Switching Valve (VSV) and fuel pressure regulator are often heat-cycled and extremely brittle. Mark each vacuum hose with masking tape before pulling it. When removing the factory Mass Air Flow (MAF) sensor, DO NOT pry against the housing. The mounting screws on these vintage Toyotas strip easily; use a properly fitting #2 Phillips screwdriver or valve-grinding compound on the bit tip to break them loose without camming out.
Phase 1: Removing the Factory Intake on your 1995-1999 Toyota 4Runner Tacoma 2.7L
- Disconnect the Battery: Loosen the negative battery terminal clamp using a 10mm wrench and isolate the cable away from the battery post to wipe the ECU fuel trims and avoid electrical shorts.
- Disconnect Sensors and Lines: Squeeze the release tab on the MAF sensor electrical harness plug and pull it straight off. Carefully unclip the factory vacuum hoses and crankcase breather line from the OEM intake tube using pliers.
- Remove the Factory Intake Tube: Loosen the hose clamps at the throttle body and factory air cleaner housing using an 8mm nut driver. Unbolt the resonator bracket from the intake manifold using a 10mm socket, then lift the stock rubber intake bellow assembly out of the engine bay.
- Unbolt the Factory Airbox: Remove the three mounting bolts securing the lower airbox tub to the inner fender apron using a 12mm socket with a 6-inch extension. Lift the complete airbox assembly out of the truck.
- Extract the OEM MAF Sensor: Place the factory airbox lid on a flat workbench. Remove the two retaining screws holding the MAF sensor into the housing using a #2 Phillips screwdriver. Gently pull the sensor straight out by its flange; never touch the exposed delicate hot-wire elements.
Phase 2: Installing the Cold Air Intake
- Transfer the MAF Sensor: Inspect the MAF sensor O-ring for tears or dry rot. Carefully slide the factory MAF sensor into the machined flange on your new cold air intake pipe. Secure it using the provided machine screws and a Phillips screwdriver—snug it down evenly to compress the O-ring without over-torquing.
- Mount the Heat Shield: Position the new intake heat shield into the factory airbox location on the inner fender. Secure it into the OEM threaded captive nuts using the supplied hardware and a 12mm socket.
- Install Couplers and Intake Tube: Slide the silicone reducer coupler onto the 3RZ-FE throttle body and secure the clamp loosely using an 8mm nut driver. Insert the new intake pipe through the heat shield opening and into the throttle body coupler. Align the pipe so it clears the fan shroud and brake lines, then tighten the clamps securely.
- Route Vacuum Lines and Air Filter: Reconnect the crankcase ventilation hose and vacuum lines to the dedicated bungs on the new intake pipe, securing them with clamps. Re-plug the factory MAF sensor electrical harness until the locking tab clicks. Install the cone filter onto the end of the intake tube inside the heat shield and tighten the clamp with an 8mm nut driver.
- Reconnect and Idle Relearn: Reconnect the negative battery terminal using a 10mm wrench. Start the vehicle and do not touch the gas pedal for at least 20 seconds. Allow the 2.7L 3RZ-FE ECU to sample the new baseline airflow and stabilize idle RPM before driving.
Disclaimer: This is a general guide provided for the 1995-1999 Toyota 4Runner Tacoma 2.7L. Always refer to your factory service manual for exact torque specifications and safety procedures.
Warranty
Warranty
All products are backed by our Limited Lifetime Warranty. We stand by our quality. [See terms]

Shopping Safely
At our Shopify store, we prioritize your safety and security. Here's how we ensure a secure shopping experience:
1. Secure Transactions: We use advanced encryption to protect your personal and payment information, ensuring it is safely transmitted and safeguarded.
2. Trusted Payment Gateways: Our store integrates with trusted payment gateways, ensuring your transactions are processed securely and efficiently.
3. Data Privacy: Your privacy is our top priority. We follow strict data protection policies to keep your personal information confidential and secure.
4. Secure Platform: Shopify provides robust security features and continuous monitoring against vulnerabilities, ensuring a safe shopping environment.
5. Verified Merchants: We are a verified merchant on Shopify, committed to providing authentic and high-quality products.
6. Transparent Policies: Our clear return, refund, and shipping policies provide peace of mind, knowing we stand behind our products.
7. Customer Support: Our dedicated customer support team is ready to assist with any concerns or questions you may have.
Shop confidently at our Shopify store, where your safety and satisfaction are our top priorities.
$99.99