Skip to product information
1 of 3

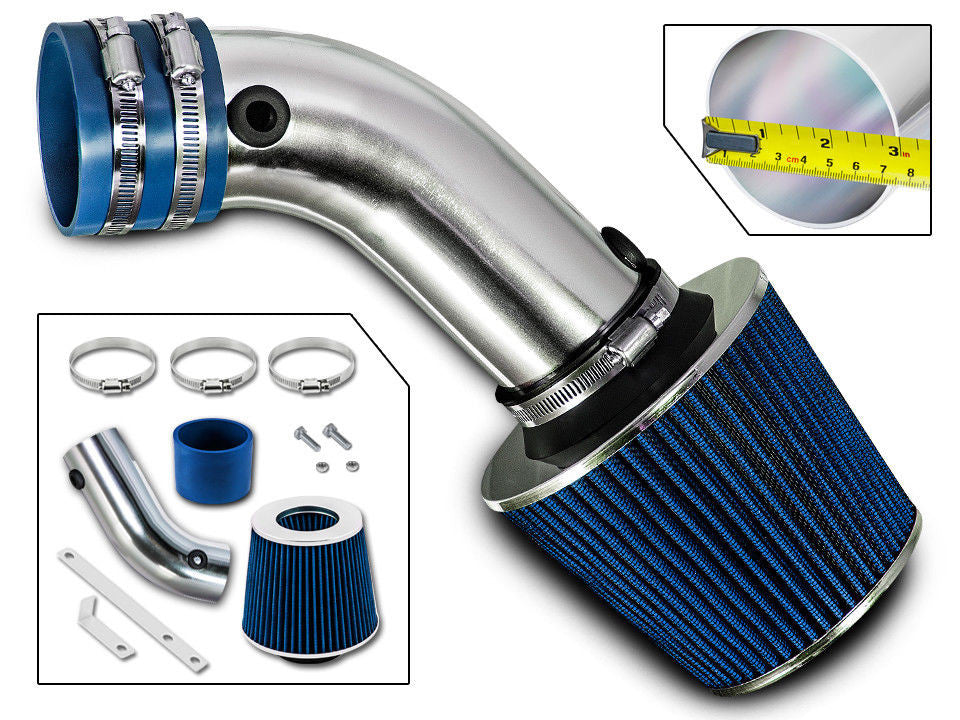
Cold Air Intake for Chevy Lumina (1990-1994) 3.1L V6 Engine


Regular price $79.99
Sale price $79.99 Regular price
Free Shipping within USA.

  • Guaranteed Fitment
  • Performance Tested
  • Lifetime Warranty

Want it soon? Order within

I18n Error: Missing interpolation value "end_date" for "Ends on {{ end_date }}"

Performance Cold Air Intake System for 1990–1994 Chevy Lumina & Oldsmobile Cutlass 3.1L V6 – Optimized Airflow & Horsepower Gains

Ensure your vehicle's maximized airflow and engine performance boost with this precision-engineered cold air intake system. Engineered specifically for the 3.1L V6 engine, this kit replaces the restrictive factory air box that often limits your vehicle's potential during spirited acceleration or highway merging. By optimizing the way your engine breathes, this system provides the cooler, denser air charge needed for improved combustion efficiency and a more engaging driving experience.

The factory intake components are designed for silence over speed, creating bottlenecks that restrict the engine's ability to breathe under load. Cooler air carries more oxygen, which translates into a more intense explosion in the combustion chamber to create more horsepower and torque. This system utilizes lightweight T304 aluminum induction tubing that effectively reduces air turbulence, allowing your V6 to act as a more efficient air pump and providing a performance increase of up to 10% throughout the entire RPM range.

Key Features & Performance Benefits

  • Power Gain: Boosts horsepower and torque by up to 10% for improved acceleration and high-end responsiveness.

  • Premium Materials: Constructed with T304 lightweight aluminum piping for long-lasting durability and better heat dissipation.

  • Instant Response: Streamlines the air intake to provide a more direct connection between the pedal and the pavement.

  • Engine Tone: Enhances the induction sound under heavy acceleration, giving your 3.1L V6 a more aggressive, mechanical note.

  • Consistent Flow: Engineered for high airflow to maintain steady air velocity for reliable performance in all driving conditions.

  • High Filtration: Exceptional filtration blocks harmful debris while allowing maximum airflow for the demands of the V6 power plant.

Vehicle Fitment

Chevrolet Lumina

1990–1994 models with 3.1L V6 Engine

Oldsmobile Cutlass Supreme

1990–1993 models with 3.1L V6 Engine

Oldsmobile Cutlass

1990 models with 3.1L V6 Engine

(Fits both Automatic and Manual Transmissions)

What's Included

Your kit features the T304 aluminum induction piping, a reusable high-flow performance air filter, and all required couplers, clamps, and hardware for a complete and secure installation.

Installation Tip

Disconnect the NEGATIVE GROUND CABLE from the battery before starting the installation and keep it off for at least one minute after you finish. This reset allows the engine's computer to learn the new airflow parameters and adjust accordingly. Ensure the engine is completely cool before beginning work.


Engine Safety Rating
Difficulty 


Fitment

Make

Chevrolet

Engine Size

  • 3.1L

Year

  • 1990
  • 1991
  • 1992
  • 1993
  • 1994

Installation & Tools

The Wrench Time

  • Estimated Time: 45-60 Minutes
  • Difficulty: 3/10 - The bolt-on process is straightforward, but dealing with 30-year-old brittle W-Body plastics and tight clearances around the dogbone motor mount requires patience.

Tools You Will Need

  • 10mm wrench (for battery terminal)
  • 10mm socket with 6-inch extension (for airbox bolts and T-bolt clamps)
  • 8mm socket or flathead screwdriver (for hose clamps)
  • Panel popper tool (for factory plastic push-pins)
  • Silicone spray lubricant (critical for sensor transfer)
Mechanic’s Pro Tip (The "Gotcha"):
The biggest headache on the 1990-1994 Chevrolet Lumina 3.1L (LH0 engine) is the factory "accordion" rubber intake tube. Over the decades, it cracks deep inside the ribs, causing massive vacuum leaks and a surging idle. When removing it, be incredibly careful with the IAT (Intake Air Temperature) sensor plugged into the side of it. The factory rubber grommet is likely rock hard. Do not pry it with a screwdriver. Spray it generously with silicone lube, pinch the base, and use a gentle twisting motion to free it so you can transfer it to your new system.

Phase 1: Removing the Factory Part

  1. Disconnect the Battery: Always start by disconnecting the negative battery terminal using a 10mm wrench to prevent check engine lights and protect the ECU.
  2. Disconnect the IAT Sensor: Locate the Intake Air Temperature sensor on the factory air inlet tube. Gently depress the locking tab and pull the wiring harness connector free. Twist and pull the sensor out of the factory grommet and set it somewhere safe.
  3. Loosen the Throttle Body Clamp: Use an 8mm socket to back off the tension on the factory worm-gear clamp securing the corrugated rubber hose to the 3.1L throttle body.
  4. Unbolt the Factory Airbox: Grab your 10mm socket and extension. Remove the factory mounting bolts securing the lower airbox to the driver’s side fender apron. Use your panel popper to release any plastic retaining clips on the fresh air scoop.
  5. Extract the Assembly: Grab the entire factory airbox and tube assembly. Wiggle it off the throttle body and lift it out of the engine bay. Watch your clearance so you don’t snag any vacuum lines near the front upper dogbone motor mount.

Phase 2: Installing the Cold Air Intake for Chevy Lumina (1990-1994) 3.1L V6 Engine

  1. Seat the Silicone Coupler: Slide the provided silicone reducer over the throttle body. Slip the provided clamps over the coupler and lightly snug them with your 10mm socket, leaving them loose enough to allow for pipe adjustment.
  2. Transfer the IAT Sensor: Press the new rubber grommet into the pre-drilled hole on your new aluminum intake tube. Apply a single drop of silicone spray to the tip of your factory IAT sensor and push it firmly into the new grommet until seated flush.
  3. Mount the Heat Shield: Drop the new aftermarket heat shield into the space vacated by the factory airbox. Secure it to the original factory mounting holes using the supplied hardware and a 10mm socket.
  4. Route the Tube and Filter: Slide the main intake tube through the heat shield and firmly into the throttle body coupler. Attach the high-flow cone filter to the end of the tube and lock it down with an 8mm socket. Check your clearances to ensure the aluminum tube is not rubbing against the dogbone mount or brake master cylinder lines, then crank down all clamps.
  5. Reconnect and Relearn: Plug the factory wiring harness back into the IAT sensor. Reconnect the negative battery terminal with your 10mm wrench. Start the vehicle, and do not touch the gas pedal for at least 20 seconds. The OBDI ECU needs this uninterrupted idle time to calibrate the air-fuel mixture to the increased airflow.

Disclaimer: This is a general guide provided for the 1990-1994 Chevrolet Lumina 3.1L. Always refer to your factory service manual for exact torque specifications and safety procedures.

Warranty

All products are backed by our Limited Lifetime Warranty. We stand by our quality. [See terms]

Cold Air Intake for Chevy Lumina (1990-1994) 3.1L V6 Engine

$79.99