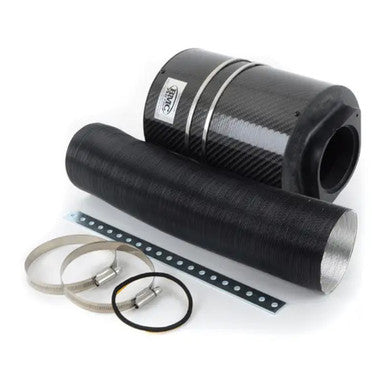
Carbon Fiber Air Box Intake for Audi and VW
Couldn't load pickup availability
- Guaranteed Fitment
- Performance Tested
- Lifetime Warranty
Want it soon? Order within
Shop safely
Secure checkout with trusted payment providers.
Thermal Shielded Airflow for the EA113 1.8T and 1.9 TDI Engine Families
Who It’s For: Designed for enthusiasts driving Volkswagen Group vehicles from the late 90s and early 2000s, specifically those running the 20V 1.8T (EA113) and the 1.9 TDI workhorse engines. Whether you are daily driving a Golf MK4 or tuning an Audi TT, this is for the driver who knows that lower intake air temperatures (IATs) equal more consistent power.
The Problem: Factory plastic airboxes on the EA113 and 1.9 TDI platforms are prone to significant heat soak. Sitting deep in the engine bay, the stock housing absorbs ambient heat, warming the air before it even hits the turbocharger. This leads to pulled timing and a noticeable loss in throttle response during spirited driving or summer months.
The Solution: This CDA (Carbon Dynamic Airbox) system replaces the restrictive factory box with a genuine carbon fiber cylindrical housing. We utilize carbon fiber because of its incredibly low thermal conductivity, creating a dedicated cold-air chamber. By isolating the washable filter element from the engine’s radiant heat and using a dynamic frontal intake, we create a pressurized "supercharging" effect that forced-feeds cooler, denser air into the manifold.
Why This is the Ultimate Upgrade
- Carbon Thermal Barrier: Unlike aluminum or plastic intakes, the carbon fiber shell rejects engine bay heat, keeping the internal air charge dense and oxygen-rich.
- Venturi Effect Design: The cylindrical internal flow deflector accelerates air velocity, reducing turbulence and allowing the turbo to spool faster.
- High-Flow Washable Element: Includes a multi-layer filtering element that provides superior filtration over stock paper filters while significantly increasing CFM capacity.
Technical Specifications
| Fitment | 1991 - 2010 Audi, VW, Seat, Skoda, and Volvo Models |
| Engine Family | EA113 (1.8T), 1.9 TDI, and 2.8L V6 |
| Factory Ratings | 90 HP to 180 HP (Platform Dependent) |
| Filter Material | Washable High-Flow Synthetic |
Compatibility & OEM Reference
Fits the Following Vehicles:
- Audi 80 IV (B4) 2.8 / Quattro (1991-1994)
- Audi A3 (8L) 1.8 T / Quattro (1996-2003)
- Audi A3 (8L) 1.9 TDI (1996-2001)
- Audi A4 (8D, B5) 1.8 T / Quattro (1997-2000)
- Audi A4 (8D, B5) 1.9 TDI (1995-2000)
- Audi A6 (4B/C5) 1.8 T / Quattro (1997-2005)
- Audi TT I (8N) 1.8 T / Quattro (1998-2006)
- Chrysler PT Cruiser 2.2 CRD (2001-2010)
- Fiat Stilo / Multi Wagon (192) 2.4 20V Abarth (2001-2010)
- Peugeot 306 2.0 HDI (1999+)
- Seat Ibiza II 1.9 TDI (1999-2002)
- Seat Leon I 1.8 20V T Cupra (1999-2005)
- Seat Leon I 1.9 TDI (1999-2006)
- Skoda Octavia I 1.8 Turbo / RS (1996-2010)
- Volkswagen Bora (A4) 1.9 TDI (1998-2002)
- Volkswagen Clasico / Jetta (A4) 1.8 T / GTI (1997-2005)
- Volkswagen Clasico / Jetta (A4) 1.9 TDI (1997-2005)
- Volkswagen Golf IV (1J1, 1J5) 1.8 Turbo / GTI (1997-2005)
- Volkswagen Golf IV (1J1, 1J5) 1.9 TDI / 4-Motion (1997-2005)
- Volkswagen New Beetle 1.8 Turbo
- Volkswagen Passat (3B2/3B5) 1.8 Turbo (1996-2000)
- Volkswagen Sharan I (7M) 1.8 T (1997-2010)
- Volvo V70 2.4 I GLT (1997-2000)
Reference Performance Data:
B4, 8L, 8D, B5, 4B, C5, 8N, 192, 1J1, 1J5, 162, A4, 3B2, 3B5, 7M, 174 HP, 150 HP, 180 HP, 110 HP, 90 HP, 75 HP, 121 HP, 170 HP, 101 HP, 115 HP, 144 HP
The Performance Promise
Buy with confidence. This system is the preferred choice for tuners looking to eliminate the heat soak issues inherent in the EA113 engine family. Backed by real automotive expertise and designed for a precise fit.
Fitment
Fitment
|
Make |
Audi |
|---|---|
|
Engine Size |
- |
|
Year |
- |
Installation & Tools
The Wrench Time
- Estimated Time: 45-60 Minutes
- Difficulty: 3/10 - Straightforward bolt-on installation requiring patience with fragile VAG plastic clips and rubber grommets.
Tools You Will Need
- 10mm socket or wrench (Battery terminal & chassis fasteners)
- T25 and T30 Torx drivers (Intake duct and sensor hardware)
- Flathead screwdriver or 7mm nut driver (Hose clamps)
- Spring clamp pliers (Factory turbo inlet clamp)
- Panel popper tool (Engine cover removal)
- Silicone spray or soapy water (Grommet lubrication)
Audi factory intake plastics and Secondary Air Injection (SAI) connectors get extremely brittle from turbo heat cycles. When unclipping the SAI connector or the small vacuum line barb on the factory airbox, do NOT muscle them off. Squeeze the ribbed sides of the collar firmly to release the internal lock. Additionally, lubricate the lower rubber mounting grommets with silicone spray; if pulled dry at an angle, you will tear the grommets or snap the mounting posts clean off the chassis.
Phase 1: Removing the Factory Audi Airbox
- Disconnect the Battery: Always start by disconnecting the negative battery terminal using a 10mm wrench to prevent ECU communication faults and check engine lights while handling engine bay wiring.
- Unplug the Sensor Harness: Locate the Mass Air Flow (MAF) or Intake Air Temperature (IAT) sensor. Slide back the grey locking tab gently with your fingernail or a small flat blade, press down on the release tab, and pull the connector off. Do not pull by the wires.
- Disconnect Vacuum and SAI Lines: Squeeze the circular locking collar on the SAI hose to release it from the factory airbox. Disconnect the small vacuum reference line attached to the underside of the intake tube by carefully working it free.
- Loosen Turbo Inlet Clamp: Use a flathead screwdriver or spring clamp pliers to loosen the clamp securing the rear intake pipe to the turbo inlet elbow.
- Remove Front Air Scoop Screws: Using a T25 Torx driver, remove the factory mounting screws holding the front air inlet duct to the core support. Lift the front duct out of the engine bay.
- Extract the OEM Airbox: Grab the factory airbox with both hands and pull straight upward with a firm, steady tug to pop the mounting prongs out of the lower chassis rubber grommets. Set the factory airbox assembly aside on a clean bench.
Phase 2: Installing the Carbon Fiber Air Box Intake
- Transfer Sensor and Hardware: Carefully unscrew the MAF sensor from the OEM housing using a T20 or T25 Torx driver. Transfer the sensor into the new carbon fiber intake housing. Ensure the O-ring seals flat and tight without pinching. Do not touch or spray the delicate hot-wire sensor element inside.
- Position Lower Mounting Grommets: Ensure the factory rubber grommets are seated properly on the Audi chassis mounting studs. Apply a light dab of silicone lubricant to the inside of the grommets to allow the new intake brackets to slide in without binding.
- Seat the Carbon Fiber Airbox: Lower the carbon fiber intake assembly into the engine bay. Align the lower mounting pins with the rubber grommets and press down firmly until the unit fully seats. Reinstall the front ram-air inlet scoop and fasten it with the factory T25 Torx screws.
- Secure the Turbo Inlet Connection: Slide the multi-ply silicone coupler over the turbo inlet elbow and carbon intake tube. Align the assembly to prevent contact with neighboring brake lines or wiring harnesses, then tighten the worm-gear clamps using a 7mm nut driver or flathead screwdriver until snug (do not over-torque carbon fiber flanges).
- Reconnect Lines and Harnesses: Click the SAI breather hose (or supplied adapter filter) into place until you hear it latch. Slide the vacuum reference hose onto the dedicated carbon box barb. Reconnect the MAF sensor plug and push the grey locking tab forward to lock the connector.
- Reconnect Battery and Perform Adaptation: Reattach the negative battery terminal using a 10mm wrench. Turn the ignition to the ON position (do not start the engine) and wait 10 seconds. Start the vehicle and do NOT touch the gas pedal for at least 20 seconds; this allows the Audi ECU to recalibrate the throttle body angle and adapt to the increased airflow at idle without throwing fuel trim codes.
Disclaimer: This is a general guide provided for Audi platforms. Always refer to your factory service manual for exact torque specifications and safety procedures.
Warranty
Warranty
All products are backed by our Limited Lifetime Warranty. We stand by our quality. [See terms]

Shopping Safely
At our Shopify store, we prioritize your safety and security. Here's how we ensure a secure shopping experience:
1. Secure Transactions: We use advanced encryption to protect your personal and payment information, ensuring it is safely transmitted and safeguarded.
2. Trusted Payment Gateways: Our store integrates with trusted payment gateways, ensuring your transactions are processed securely and efficiently.
3. Data Privacy: Your privacy is our top priority. We follow strict data protection policies to keep your personal information confidential and secure.
4. Secure Platform: Shopify provides robust security features and continuous monitoring against vulnerabilities, ensuring a safe shopping environment.
5. Verified Merchants: We are a verified merchant on Shopify, committed to providing authentic and high-quality products.
6. Transparent Policies: Our clear return, refund, and shipping policies provide peace of mind, knowing we stand behind our products.
7. Customer Support: Our dedicated customer support team is ready to assist with any concerns or questions you may have.
Shop confidently at our Shopify store, where your safety and satisfaction are our top priorities.
$325.00