Skip to product information
1 of 6

Cold Air Intake for Chevy Impala & Caprice (1994-1996) 4.3L 5.7L V8 Engines


Regular price $139.99
Sale price $139.99 Regular price
Free Shipping within USA.

  • Guaranteed Fitment
  • Performance Tested
  • Lifetime Warranty

Want it soon? Order within

I18n Error: Missing interpolation value "end_date" for "Ends on {{ end_date }}"

Eliminate the restrictive "Home Plate" and "First Base" resonators on your B-Body and finally let that LT1 breathe the way GM should have from the factory.

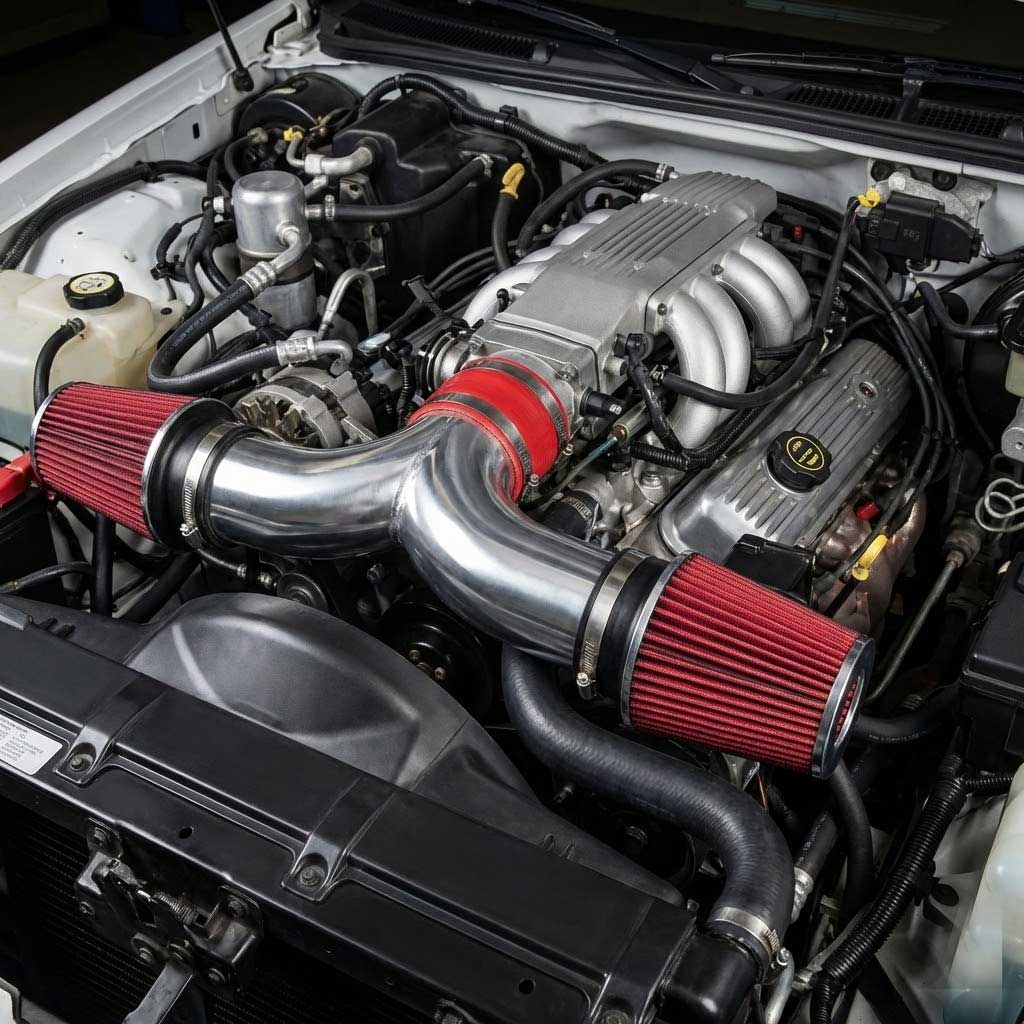
Performance Cold Air Intake System for Chevy Caprice & Impala SS (LT1/L99)

If you’re still running the factory intake on your 1994–1996 B-Body, you’re choking your V8 with a design prioritized for silence over performance. The stock "Home Plate" resonator sits directly on top of the engine, acting as a massive heat sink that soaks up engine bay temperatures and slows down intake velocity. For those of us who spend time on the forums, we know the "Home Plate Delete" is one of the first mods every owner does—this kit takes that fix to the next level.

This system replaces the entire restrictive assembly with mandrel-bent T-304 aluminum piping. By streamlining the path from the filter to the throttle body, you’re reducing the air turbulence that plagues the stock plastic bellows. Whether you are running the high-revving 4.3L L99 or the legendary 5.7L LT1, this intake provides the cooler, denser air charge required to maximize your ignition timing and fuel maps. It’s the most cost-effective way to get that signature B-Body induction growl while sharpening throttle response.

Beyond the sound, the real benefit is the removal of the factory bottlenecks. The lightweight T-304 aluminum construction is specifically chosen for its ability to dissipate heat faster than the stock rubber and plastic components. This ensures that even during stop-and-go traffic or staging at the track, your intake air temperatures (IATs) stay as low as possible, preventing the ECU from pulling timing and robbing you of power.

Why You Need This Upgrade

  • Mandrel-Bent Velocity: The smooth-wall T-304 aluminum piping eliminates internal turbulence for a faster, more direct air charge.
  • Heat Soak Resistance: Lightweight aluminum dissipates heat far more efficiently than the bulky, heat-trapping OEM plastic resonators.
  • Aggressive Induction Note: Replaces the silence-tuned factory boxes with a deep, throaty V8 growl that opens up under wide-open throttle.
  • Improved Throttle Mapping: Increases air velocity to eliminate that "heavy" pedal feeling common in stock Caprices and Impalas.
  • High-Flow Filtration: The included washable filter provides superior surface area compared to paper elements, ensuring the LT1 never starves for air.
Fitment 1994-1996 Chevy Caprice & Impala SS
Engine Code 5.7L LT1 / 4.3L L99
Installation Easy / Est. 45 Minutes
Material T-304 Aluminum / Polished Finish

Installation Notes

This is a true bolt-on kit. Pro Tip: Disconnect the negative ground cable from the battery for at least ten minutes during the install. This forces the PCM to reset its long-term fuel trims, allowing it to "learn" the increased airflow from the new system immediately upon startup. Ensure all clamps are tightened securely to prevent unmetered air leaks past the MAF sensor.

Replaces These OEM Applications & Part Numbers

  • 1994-1996 Chevrolet Caprice (4.3L L99 & 5.7L LT1 V8)
  • 1994-1996 Chevrolet Impala SS (5.7L LT1 V8)

T-304 Aluminum Intake Pipe, High-Flow Air Filter, Mounting Clamps, Silicone Couplers, Installation Hardware

Stop choking your V8 with 30-year-old plastic tech—upgrade to a high-velocity intake and feel the difference in every gear.


Engine Safety Rating
Difficulty 


Fitment

Make

Chevrolet

Engine Size

  • 4.3L
  • 5.7L

Year

  • 1994
  • 1995
  • 1996

Installation & Tools

The Wrench Time

  • Estimated Time: 45-60 Minutes
  • Difficulty: 3/10 - A straightforward bolt-on job, but wrestling 30-year-old brittle plastics requires patience.

Tools You Will Need

  • 10mm Socket & Ratchet (For battery, resonators, and factory airbox bolts)
  • 8mm Socket or 5/16-inch Nut Driver (For hose clamps)
  • Small Flathead Screwdriver (For sensor harness clips)
  • Panel Popper Tool (To assist with stubborn plastic retainers)
  • MAF Sensor Cleaner (Highly recommended while the sensor is out)
Mechanic’s Pro Tip (The "Gotcha"):
Any B-Body forum veteran will tell you the biggest headache on the 1994-1996 Chevrolet Caprice Impala 4.3L 5.7L platform is the massive factory resonator setup known as "Home Plate" (on top of the engine) and "First Base" (on the intake tube). The factory rubber elbow connecting Home Plate to the throttle body has been heat-cycling for decades and is incredibly brittle. When wrestling it off, DIYers frequently snap the fragile IAT (Intake Air Temperature) sensor stuck inside it. Pull the sensor out first using a gentle twist before yanking on the dry-rotted rubber.

Phase 1: Removing the Factory Part

  1. Disconnect the Battery: Always start by disconnecting the negative battery terminal using a 10mm wrench to prevent check engine lights and to reset the ECU fuel trims.
  2. Unplug the Sensors: Locate the MAF (Mass Air Flow) sensor on the intake tube and the IAT sensor housed in the throttle body elbow. Carefully depress the retaining clips with a small flathead screwdriver and unplug both harnesses. Tuck them safely out of the way.
  3. Remove "Home Plate": Grab your 10mm socket and remove the two mounting nuts securing the massive upper resonator to the top of the intake manifold. Pull it straight up to unseat it from the rubber mounting grommets.
  4. Loosen the Clamps: Take your 8mm socket or 5/16-inch nut driver and completely back off the factory hose clamps securing the intake tube to the throttle body and the MAF sensor housing.
  5. Extract the Airbox: Unclip the factory airbox lid. Use your 10mm socket to remove the lower airbox housing bolts bolted to the inner fender. Lift the entire restrictive assembly, including the "First Base" silencer and the old filter, out of the engine bay.

Phase 2: Installing the Cold Air Intake for Chevy Impala & Caprice (1994-1996) 4.3L 5.7L V8 Engines

  1. Transfer the Sensors: Use your hands and a gentle twisting motion to pry the IAT sensor out of the factory rubber elbow. Next, unbolt the MAF sensor from the factory housing. Handle the MAF with extreme care—do not poke or touch the exposed hot wires inside. Carefully push the IAT sensor into the provided grommet on your new intake tube, and bolt the MAF sensor into its new position.
  2. Assemble the Heat Shield: Drop the new aftermarket heat shield into the exact location of the factory airbox. Secure it to the inner fender using the supplied hardware and your 10mm socket.
  3. Route the Intake Tube: Slide the provided silicone couplers onto the throttle body and the new intake tube. Slip the hose clamps over the couplers, but keep them loose for now so you can rotate the tube for the best fitment.
  4. Install the Filter and Lock It Down: Attach the high-flow air filter to the end of the intake tube inside the heat shield boundary. Verify the tube doesn’t rub against the fender, alternator, or coolant lines. Once perfectly aligned, crank down all hose clamps snugly using your 8mm socket or flathead screwdriver.
  5. Reconnect and Initialize: Reconnect the MAF and IAT sensor harnesses, ensuring the plastic tabs click securely into place. Reconnect your negative battery cable with a 10mm wrench. On the very first startup, the vehicle gas pedal should not be touched for at least 20 seconds. Let the car idle so the ECU can properly map the fresh, unrestrictive airflow feeding your LT1 or L99.

Disclaimer: This is a general guide provided for the 1994-1996 Chevrolet Caprice Impala 4.3L 5.7L. Always refer to your factory service manual for exact torque specifications and safety procedures.

Warranty

All products are backed by our Limited Lifetime Warranty. We stand by our quality. [See terms]

Cold Air Intake for Chevy Impala & Caprice (1994-1996) 4.3L 5.7L V8 Engines

$139.99